Tablet weaving (also known as cardweaving) is an ancient form of
weaving, some say that even the Egyptians used it. It was very popular
among the vikings and the Slavs in the medieval times and in villages in
Eastern Europe it is still practiced to this day. Though it may seem
complicated, tabletweaving is not rocket science and with a little
effort and patience anyone can master it. The most important thing of
course are the tablets or cards. The most universally used is the four
holed, but there are ones with two, three, five, six and even eight
holes. I mostly use the four holed one and that is the one I will be
showing how to use today. In olden days these tablets/cards were made
from wood, but don't disappear if you don't have wooden ones, you can make
them yourself, all you need is some sturdy material that doesn't bend
easily, I used old calendars and I know some people make them out of
cards or cardboard. Whatever works best for you. Make sure it's an even
square and punch four holes along the sides, and your tablets are
ready. I also number mine as to keep from getting confused

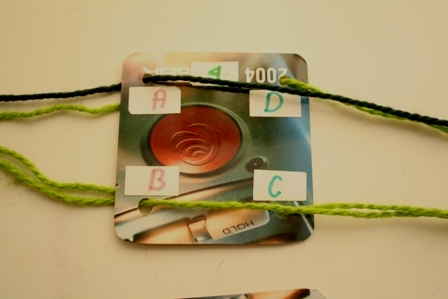
if you are wondering what the A,B,C,D means, those letters are assigned to one of the holes, this aides greatly when threading the tablets, to know which thread goes into which hole.
Next you need to decide on a design, you can make up your own or find one on the Internet. Making up your design is not exactly complicated, but it does require a certain amount of thinking and calculating. I usually use a program called Guntram's Tabletweaving Thingy (also known and GTT) here's a link http://www.guntram.co.za/tabletweaving/gtt.htm it helps in making your own designs as well as having a few ones already made. Here is the design that I will be making
(this design I found on the GTT site, it's NOT mine and I do NOT take credit for making it, I am merely using it for this simple workshop on how to tabletweave :) )

It may look complicated, but in real life it's really simple. I drew the
design out on a piece of notebook paper with squares on it. The numbers
on the top represent which number card to use, the letters on the sides
are the holes in which the threads go, the red squares are threads that
makes out the actual design, the yellow squares are the background
threads and the S and Z are the directions in which the threads will
look. This part is a little tricky, but once you get the point it all
becomes simple. When explaining to people the difference between S and Z
I usually use a simple drawing


Basically, with Z you thread the yarn in through the bottom and with S you thread the yarn in from the top (providing you tie the knot on the left side)
It's important to not mix up S and Z because you design depends greatly on it.
Now it's time to thread the tablets. You can use whatever kind of yarn you want, I will be using wool. If you are new to tabletweaving, I suggest you start with a thicker sort of yarn, as it tangles less easily and is easier to untangled.
According to this design, you'll need 10 threads for the design and 30 for the background. I'll be using dark green for the design, and light green for the background, but for the two edges of the belt I've decided to make dark brown instead of green.
So take the first tablet and according to the design, all four of the holes will be one color, brown in my case and the threads will be S, meaning they will be facing downward
When you've put the yarn through the holes, tie a knot at the end
For the second tablet again, all four holes will have yarn of the same color, light green in my case

for the third tablet, holes B and C will be with the design threads, dark green in my case
and so on it goes until all the tablets have been threaded
Once we've gotten to the sixth tablet we're going to switch from S to Z

Once you have finished threading the tablets, stack them one on top of the other in numerical order and separate the top threads from the bottom thread

After this tie the tablets together using a piece of thread
Now it is time to brush out the knots in the thread, you can have someone who can hold the tablets while you come out the knot, or you can find something with a hook, in my case, I used a doorknob
Combing out the knots can be pretty frustrating, especially if you are working with a thinner type of yarn, you need a bit of patience and determination :) Better use you fingers, combs are cool, but they can do more harm then good and get things even more tangled, not to mention ruin your thread a bit
Once you are done combing tie a knot at the end, make sure that your threads are tight and even, this is important later for weaving.
You will need to tie the threads to something before you start weaving, it can be anything as long as it is firm and won't move anywhere when you pull back, a table leg, the radiator, a bed post, anything. Just be sure that it's not going to start moving when you will apply tension
The other end with the tablets you will need to tie around your waste, do this by using a belt
An important factor here is to keep the threads tight, if the threads are slack then the design will be ruined, while the tablets are tied, you have nothing to fear, but when you start weaving and untie the tablets, you have to be sure to keep your threads tight, you do this simple by leaning backwards a little. That's why it's a good idea to make sure you have a comfortable seat, like a chair with a back so you can lean backwards without putting strain on your back. Now choose some thread to be the weft, I will be using green and you can start weaving.
Take weft and put it through the space created by the upper and lower threads
Now turn the tablets forwards, make sure that you've turned them all
Push back the threads with your hand, put the weft through again and repeat the process. The threads at the other end of the tablets will be getting tangled too, pus them back in the other direction. At one point they will get so tangled that you will have to tie the tablets again and comb out the knots like you did in the beginning. The is because for this particular design we are always turning the tablets forwards.
The end product should look like this. The green spots on the sides were made because I used green yarn for the warp, if you don't want them, just use yarn the same color are the edges. Dark brown in this case.
the knots on the ends you can just cut off, or if you are like me and want to save on yarn, then you can untie them, but it's a bit of a hassle, especially if you are using a thinner kind of yarn.
If you want to experiment a bit, instead of always turning the tablets forwards, try going, four times forwards, four times backwards, you will get a different design.
I hope this was in someway helpful in the basics of tabletweaving :)
Please note that this a non-profit tutorial and while you are free to use it please don't claim as your own or use for anything other than what it was originally meant for, thank you so much


